MS-700: Fire the EPIC Strobe on Every Intercom, Page & Notification
Quick Reference QR-AE-001 · Audio Enhancement EPIC · Rev 1.1 · Sept 2026
Use this when a strobe needs to go off for any broadcast, not just one specific event.
📄 View or download this guide as a PDF
Click the PDF icon below to open the guide right here in your browser. In the viewer, use Download (top right) to save a copy, or the printer icon to print it.
✅ What this does
Strobe WILL fire for | Strobe will NOT fire for |
|
This is intended. Classroom mic audio doesn't close GPO4, so the strobe stays off. |
🧰 What you need
- MS-700 amplifier
- EPIC Strobe (ST-AC-2187)
- RJ-45 patch cable
- RJ-45 plug + short piece of wire (for the jumper)
- Access to the EPIC Event Engine
1️⃣ Set all 5 strobe DIP switches to OFF
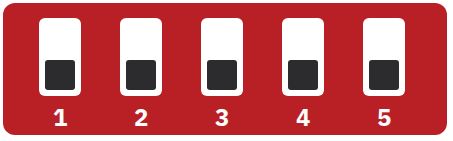
All OFF = Serial Control Mode, Hardware Address 1 (the AE default). DIP 3, 4 & 5 OFF selects serial mode, and DIP 1 & 2 set the address. Toggle toward the number = OFF.
2️⃣ Plug the strobe into a Remote Control port
Serial mode requires a RMT CTRL port. Any of them works, but the number after $SSP: in every command must match the port you use. This guide uses RMT CTRL 1.
Strobe plugged into | Command starts with |
RMT CTRL 1 |
|
RMT CTRL 2 |
|
RMT CTRL 3 |
|
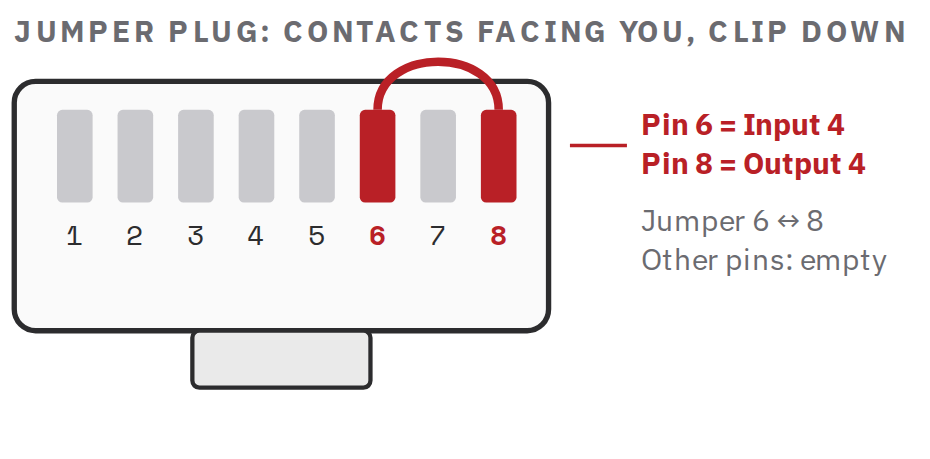
3️⃣ Build a jumper plug: pins 6 & 8 into GPIO 3&4
Crimp an RJ-45 plug with a short wire connecting pin 6 (Input 4) to pin 8 (Output 4), then plug it into the GPIO 3&4 port. Leave all other pins empty.
4️⃣ Create two events in the EPIC Event Engine
EPIC doesn't reverse actions on its own, so the strobe needs a separate "off" event.
Setting | Event 1: Strobe Start | Event 2: Strobe Stop |
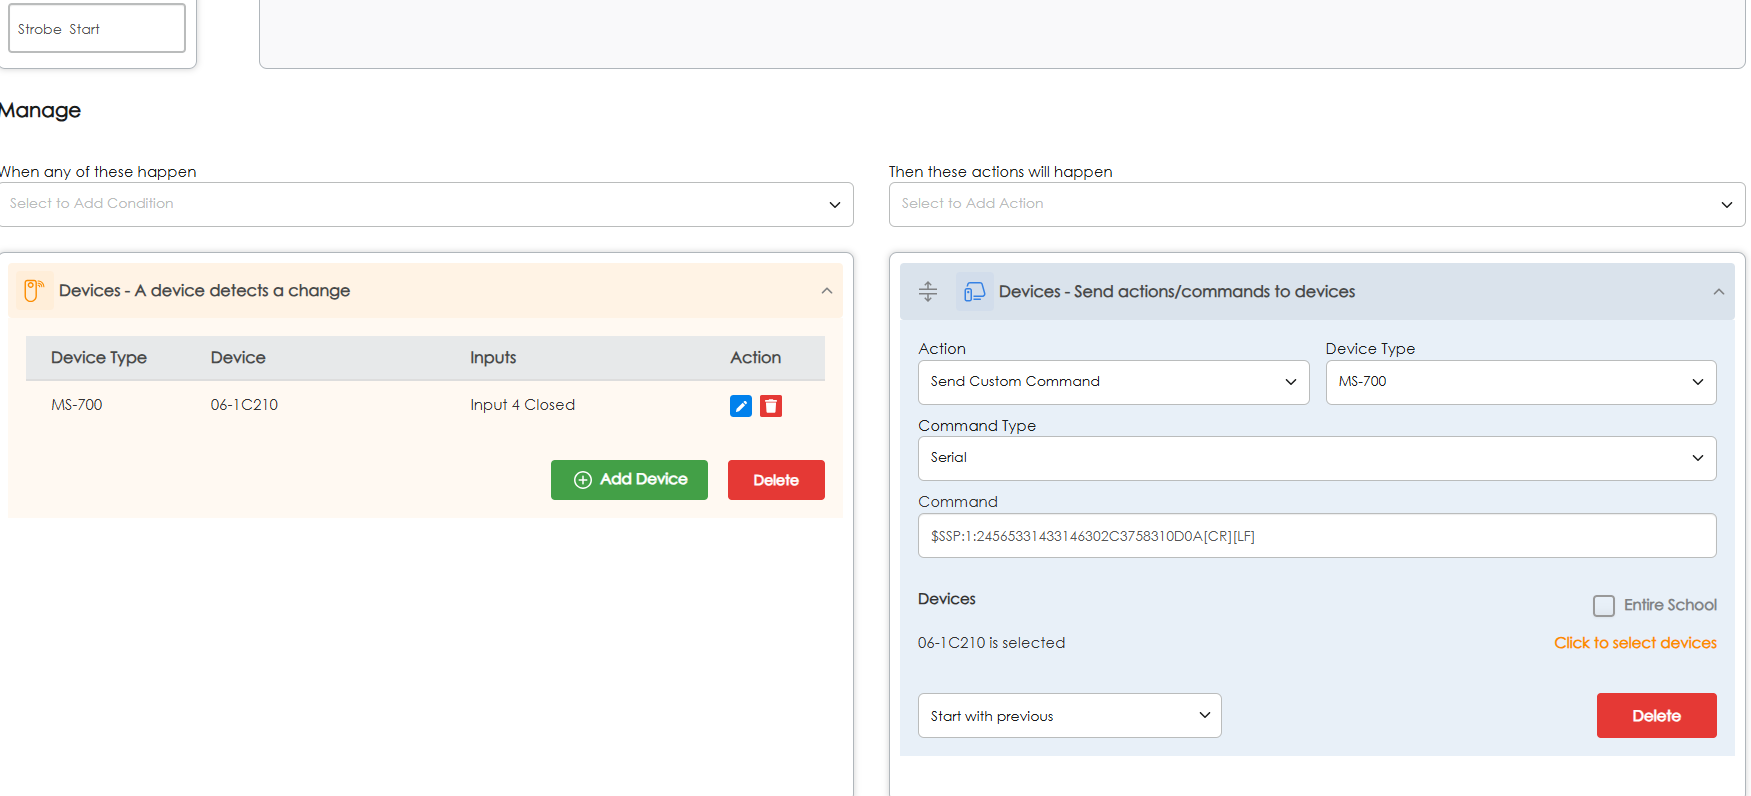
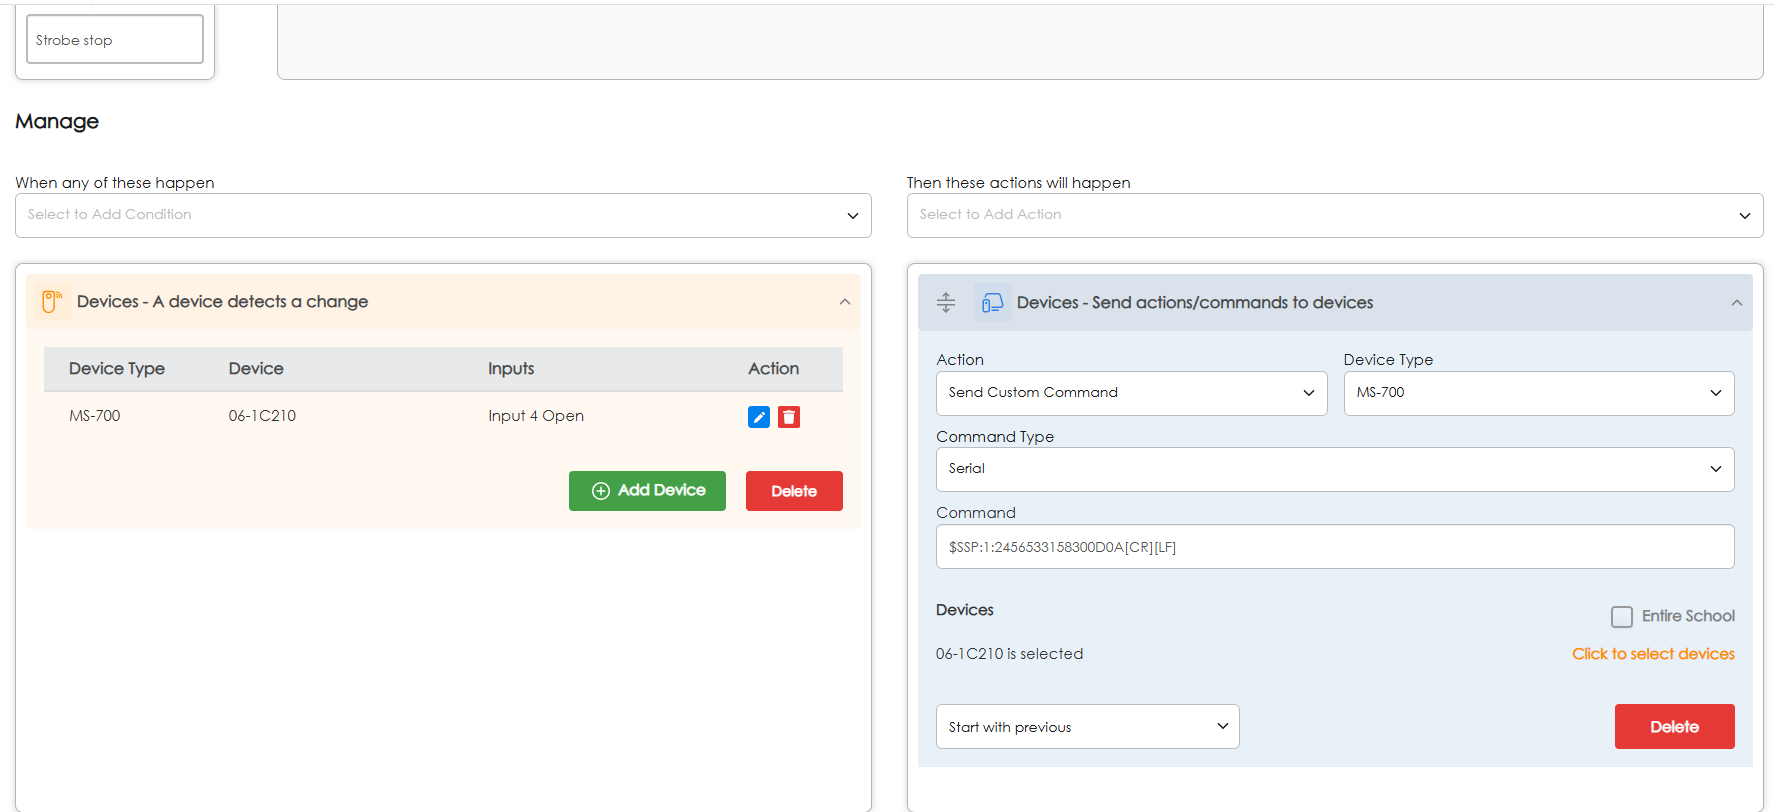
When any of these happen | Devices – A device detects a change → Device Type MS-700 → select every MS-700 that has a jumpered strobe | Devices – A device detects a change → Device Type MS-700 → select every MS-700 that has a jumpered strobe |
Input | Input 4 Closed | Input 4 Open |
Then these actions will happen | Devices – Send actions/commands to devices → Action Send Custom Command → Device Type MS-700 → Command Type Serial → same device(s) → Start with previous | Devices – Send actions/commands to devices → Action Send Custom Command → Device Type MS-700 → Command Type Serial → same device(s) → Start with previous |
Command |
|
|
Copy/paste commands
Strobe Start (red, flashing):
$SSP:1:24565331433146302C3758310D0A[CR][LF]
Strobe Stop:
$SSP:1:2456533158300D0A[CR][LF]
Using RMT CTRL 2 or 3? Change $SSP:1 to $SSP:2 or $SSP:3 in both commands.
Example screenshots
Strobe Start: Input 4 Closed → start command
Strobe Stop: Input 4 Open → stop command
💡 Why the jumper works
🔎 Reading the command
$SSP:1:24565331 4331 46302C37 5831 0D0A[CR][LF]
Part | Means | Change it to… |
| Send out RMT CTRL port 1 |
|
|
| Last two digits: |
|
|
|
|
| Leave as is |
|
|
|
| Return + line feed for the strobe / ends the command in EPIC | Always keep both |
🎨 Want a different color?
In the Start command, swap the 4331 for the color code below. The Stop command stays the same for every color.
Color | Swap 4331 for | Full Strobe Start command (port 1, address 1) |
🔴 Red |
|
|
🟠 Orange |
|
|
🟡 Yellow |
|
|
🟢 Green |
|
|
🩵 Aqua |
|
|
🔵 Blue |
|
|
🟣 Purple |
|
|
🔢 Strobe hardware addresses
Set with DIP 1 & 2. DIP 3–5 stay OFF on every strobe for serial mode.
Address | DIP 1 | DIP 2 | Hex in command |
All strobes | any | any |
|
1 (default) | Off | Off |
|
2 | Off | On |
|
3 | On | Off |
|
4 | On | On |
|
🔗 Daisy-chaining strobes
- Run CAT6 from RMT CTRL to strobe 1, then strobe 1 to strobe 2, and so on.
- Same color everywhere? Leave them all at address 1 and one command runs them all.
- Different colors per strobe? Give each strobe its own address, then send a separate command per address (or use
24565330to hit all of them). - Power note: the older EPIC Strobe Spec Sheet (DC-41143.0725) lists 2 max on an MS-600/MS-700, and each strobe draws 250 mA at 24 V. Plan for 2 per MS-700 unless AE confirms 4.
🖲️ Running an ITC through a strobe
- The ITC talks to the amp over RS-232 on a RMT CTRL port and draws 24 V from it. Because the strobe ports are pass-through, the ITC should work plugged into the strobe's second port.
- The strobe only responds to
$VScommands, so ITC traffic on the same line shouldn't trigger it. - Watch power. AE notes an MS-700 that keeps rebooting with peripherals like an ITC attached may be drawing too much.
🛠️ Field tips & troubleshooting
- Strobe not firing on broadcasts? Make sure GPO4 is set to close for intercom, page and notification on that MS-700.
- No response at all? Check that
$SSP:#matches the port and that DIP 1 & 2 match the address. Try typing the command instead of pasting it. - Changed a DIP switch? Power-cycle at the amp. Settings only load at startup.
- Emergency events with their own strobe color: open GPO4 first to clear the intercom strobe, then send the new color with a 1-second delay.
- Wrong color? Check the hex with an ASCII-to-hex converter (AE suggests rapidtables.com).
- Amp rebooting after adding strobes or an ITC? Too much draw on the 24 V remote power. Remove a device and retest.
Source files: SharePoint › Odoo › Quick Reference › VSC Guides › Audio Enhancement › QR-AE-001. Official AE reference: EPIC Strobe Manual DC-41258.0426 (see AE How To / AE Knowledge Base).