Link, Charge & Care for Classroom XD Microphones
Quick Reference QR-AE-013 · Audio Enhancement · Rev 1.3 · Oct 2026
Pair teacher, student and Mic360 mics to a classroom amp, set the media channel, and keep them charged and clean.
📄 View or download this guide as a PDF
Click the PDF icon below to open it right here in your browser. In the viewer, use Download (top right) to save a copy, or the printer icon to print it.
Every XD mic links the same basic way: put the amp in link mode with its LINK button, then put the mic in link mode. A beep through the speakers and an extra green light on the amp mean it worked. Leave a Teacher Microphone card (CC-AE-001) in every room so staff know what the buttons do.
| Mic | Put it in link mode | Good to know |
|---|---|---|
| XD Teacher Pendant | Mic off. Hold REC, then press and hold PWR until it links. | Controls volume for every mic in the room. Both side buttons send a SAFE alert. PWR/MUTE: hold about 3 seconds to turn on or off; tap once to mute or unmute. |
| XD Student Handheld | Hold PWR LINK on the back, and while holding it slide TALK up. | Slide TALK up to turn the mic on; slide it down to turn it off. Or press and hold the round push-to-talk button to talk. Has a line-level aux input (AUDIO IN). |
| Mic360 2.0 throwable | Power on (hold 2 s), then hold LINK for 1 s. | Twist the foam windscreen counterclockwise to reach the buttons. Mutes itself while moving. |
1️⃣ Put the amplifier in link mode
- Make sure the mic you're linking is off.
- Press the LINK button on the front of the MS-700, MS-600 or XD Receiver (on a BEAM it's on the side). The amp's LINK light blinks yellow.
2️⃣ Link the XD Teacher Pendant
- With the amp blinking yellow and the mic off, press and hold REC.
- While holding REC, press and hold PWR until the mic links.
- You'll hear a beep through the speakers and see an extra green LED on the amp. The mic's LINK light turns green.
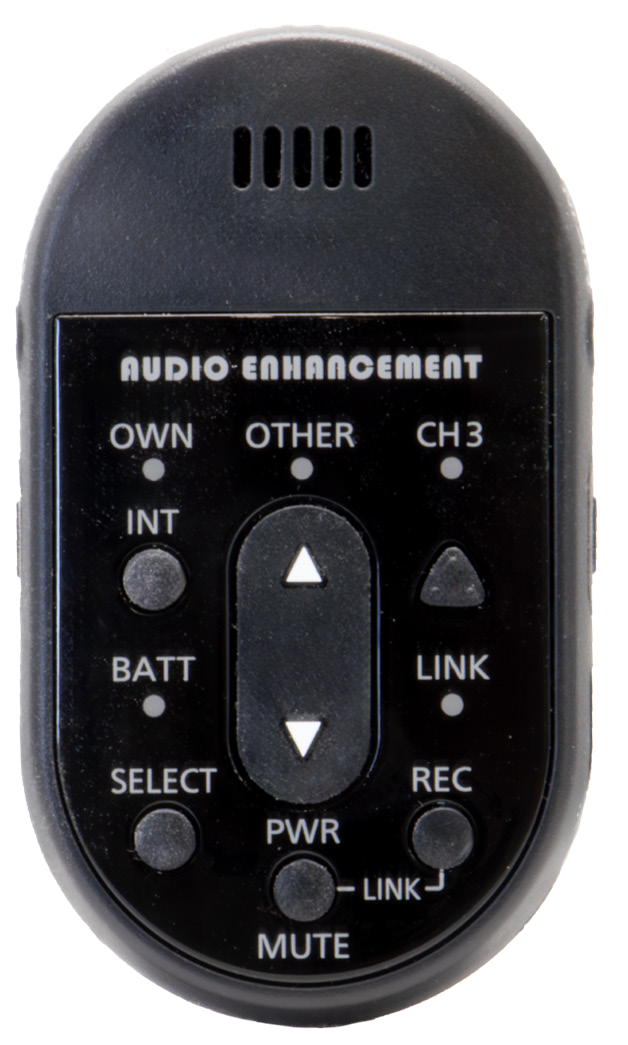
XD Teacher Pendant (USB-C model with INT and SELECT/Confirm).
3️⃣ Link the XD Student Handheld
- Press LINK on the amp (blinking yellow).
- On the mic, press and hold PWR LINK on the back.
- While holding it, slide TALK up with your thumb. A beep and an extra green LED on the amp confirm the link.
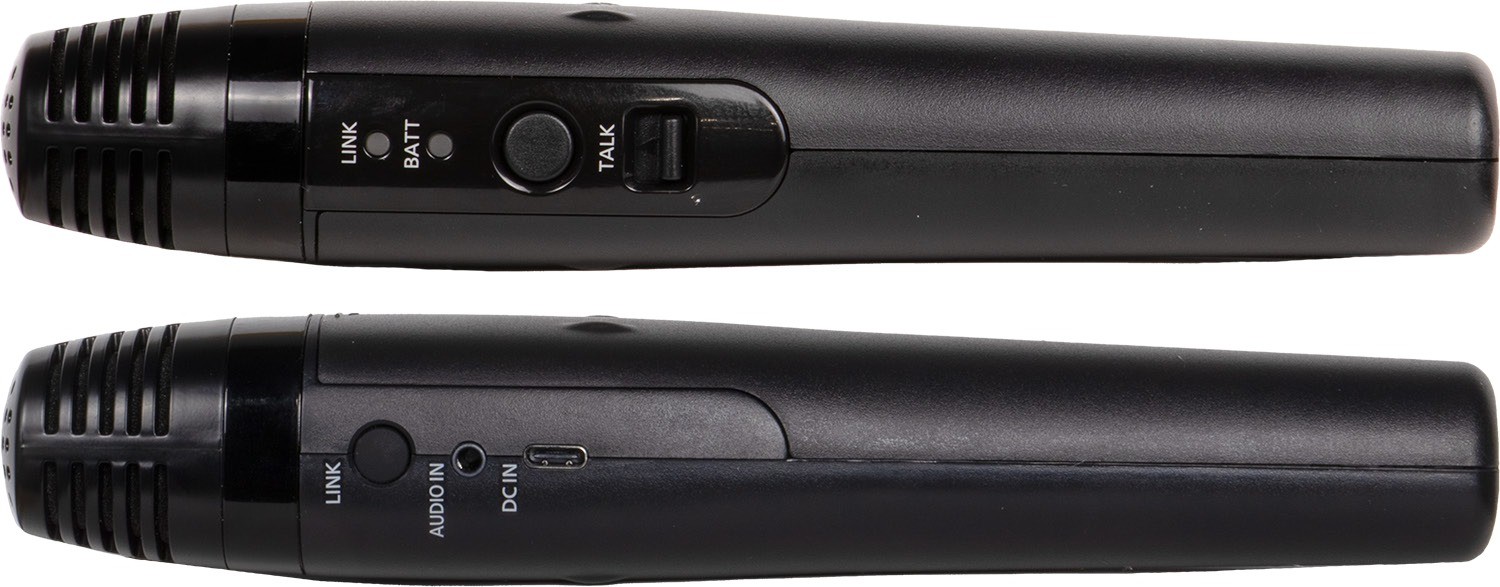
XD Student Handheld. Front (top): LINK and BATT lights, push-to-talk button, TALK slide switch. Back (bottom): PWR LINK button (marked LINK), AUDIO IN, USB-C charging port (DC IN).
4️⃣ Link the Mic360 2.0
- Twist the windscreen counterclockwise to reach the controls.
- Hold Power for 2 seconds. The light ring blinks yellow slowly.
- Press LINK on the classroom amp.
- Hold LINK on the Mic360 for 1 second. The ring blinks yellow in sequence.
- Success: a beep, the green LEDs on the amp, and a green ring.
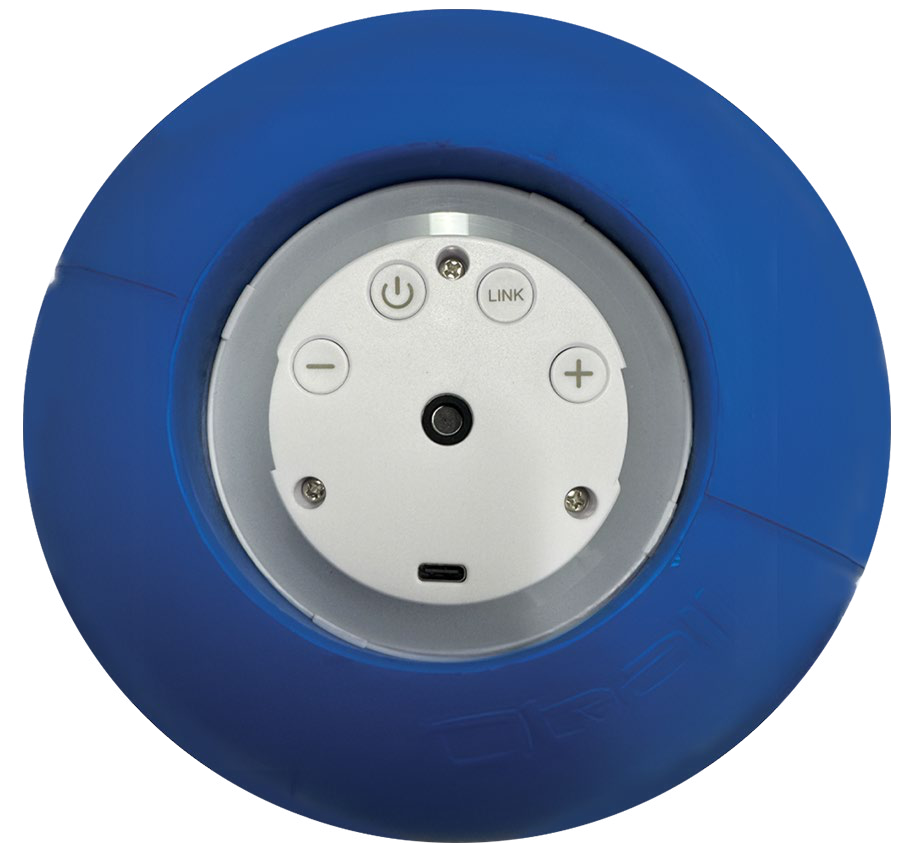
Mic360 2.0 with the windscreen removed: Power, LINK, volume −/+, USB-C.
5️⃣ Add a third mic on the media channel
- Confirm the MIC 1 and MIC 2 mics are both on and linked.
- Turn off the mic you want to add.
- Link it with step 2, 3 or 4.
- After about 10 seconds you'll hear a beep and the amp's LINK LED stays solid yellow.
6️⃣ Set volumes from the teacher mic
- Press SELECT to choose what the arrows adjust. The light shows the choice: OWN (the teacher mic), OTHER (the other mic, usually the student handheld), CH3 (the third channel / media). The light goes out after 5 seconds.
- Press ▲ or ▼ to adjust. The room's baseline levels are set in EPIC at Settings › Classroom Volumes: pick the device and move the sliders; changes apply live (details in QR-AE-011).
7️⃣ Charge and check the lights
| Light | What it means |
|---|---|
| LINK | Green linked · blinking yellow connecting · blinking red not linked · off while the teacher mic is charging |
| BATT | Teacher mic: green on and charged · blinking red charging (a fast blink means the USB-C plug isn't all the way in). Student mic: red = low battery. |
| Mic360 ring | Green live · purple linked but muted (moving or resting on the windscreen) · slow yellow reconnecting · fast yellow linking · red LEDs in sequence = charging (all four solid = full) |
- Charge every night with the supplied USB-C charger: about 4 hours to full, 8 to 10 hours of talk time.
- The teacher mic can't link or be used while it's charging (LINK is off). The student handheld keeps working while it charges, so it can stay plugged in.
- Spare batteries: the XD-5012 Triple USB External Charger charges three XD mic batteries at once (5 V 2 A USB-C wall adapter).
8️⃣ Clean the mics
- Power down first. Wipe all surfaces with a 70% isopropyl alcohol solution. Take the lanyard off to wash it.
- Mic360: remove the foam cap, wash it in warm, mildly soapy water and let it dry completely; wipe the ball.
Field tips
- Won't link? Make sure the mic was off before you started and the amp is still blinking yellow. Link mode times out after about 20 seconds, so press LINK again.
- Linked to the wrong room? Neighboring amps can be in link mode at the same time. Link one room at a time.
- Third mic won't take? Both MIC 1 and MIC 2 have to be on during the link.
- Squeal or feedback? Lower OWN with the arrows, then check the room's EQ and levels in EPIC at Settings › Classroom Volumes (QR-AE-011).
📚 Sources & credits
- Compiled by Brad Roy, VSC Director of Operations
- Audio Enhancement: XD Microphone Quick Start Guide DC-40545.0526 (button map, linking, media channel, charging, volume); XD Teacher Microphone Spec Sheet DC-40440.0924 (controls, LEDs, battery); New XD Teacher Mic Difference Flyer DC-41050.0924 (INT and Confirm); XD Student Microphone Spec Sheet DC-40441.0124; Mic360 2.0 QSG DC-41147.0426; MS-700 Optimum System QSG DC-41034.0824; XD Receiver manual DC-41037.1223 (SELECT for other mic / line in)
- Audio Enhancement: Microphone Sanitizing Guide DC-40810.02 and Triple USB External Charger SS DC-41235.0126
- Product photos: Audio Enhancement