Install and Set Up InfoView Displays
Quick Reference QR-AE-027 · Audio Enhancement EPIC · Rev 1.1 · Oct 2026
Mount InfoView clocks and signs, power them over PoE, adopt them in EPIC and check that emergency signs come through.
📄 View or download this guide as a PDF
Click the PDF icon below to open it right here in your browser. In the viewer, use Download (top right) to save a copy, or the printer icon to print it.
InfoView puts EPIC on a screen: clocks, digital signs (images, announcements, ticker tape, next bell) and emergency signs that appear on their own when EPIC runs an event. There are two ways to get there. The InfoView Display is a 24" screen with the player built in. The InfoView Display Interface (EP-0036) is a small player box that drives any display over HDMI. Both run on one PoE network cable, and once EPIC adopts them, EPIC controls everything they show.
| InfoView Display (24") | InfoView Display Interface (EP-0036) | |
|---|---|---|
| What it is | 24" Full HD (1920 x 1080) screen with the player inside | Player box. HDMI out to the district's display |
| Power | PoE 802.3at (PoE+) or better. AE lists consumption as "> 30 W (average)" | PoE on the LAN port. 5 V DC input is optional |
| Network | 10/100 Ethernet, RJ45. DHCP lets it find the network on its own (static is set with the app, step 5) | |
| Mounting | VESA 75 x 75 mm. 6.75 lb, 13.2 x 21.9 x 2.6 in | Sits with the display it drives (AE gives no bracket for the box) |
| Other ports | 2 x USB 2.0, SD card, 3.5 mm jack (hides the factory reset) | EXT (setup dongle), MEM (card slot, updates only), 3.5 mm jack (factory reset), SYS (for future use) |
1️⃣ Plan the mounting
- Wall or single display: the InfoView Display takes any VESA 75 x 75 mm mount. Follow the drawings for the mount and the project's mounting heights.
- Hallway, back-to-back from the ceiling: AE's documents show a Peerless PLB-1 back-to-back tilt box on an extension column. It holds two displays facing opposite ways and tilts each one +20° / -5°.
- Pole drop: AE's documents show a Peerless EXT extension column hung from a Peerless ceiling plate (ACC500 series or PLCM-2, sold separately). Check the column length on the drawings.
- Make sure the structure above can carry the mount and both displays. Get a second person on the lift for overhead work.
2️⃣ Hang the ceiling hardware
- Mount the ceiling plate to structure and thread the extension column into it (5 full turns). Lock it with the M5 x 10 mm set screw.
- For a back-to-back pair: slide the washer and retaining collar onto the bottom of the column inside the PLB-1 tilt box (5 turns), then lock the collar with the three M5 x 12 mm screws. The 4 mm Allen wrench comes in the box.
- Attach a tilt plate to each display through an adapter plate (Peerless ACC918 or PLP-UNL/PLP-UNM, sold separately).
- Hook each display onto the tilt box, set the tilt, and tighten the lower screws.
- Run the network cable down through the column before the displays go on.
Peerless tightening rule: snug the screw until the head makes contact, then another 1/2 turn. Don't overtighten.
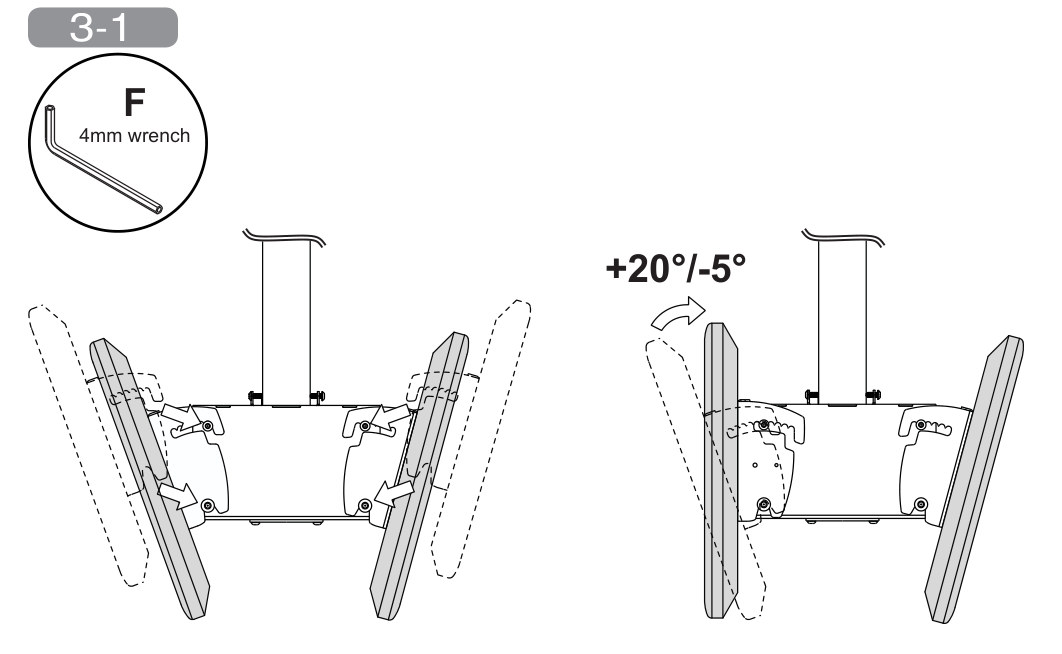
PLB-1: hook on the displays, then set +20° / -5° tilt and tighten.
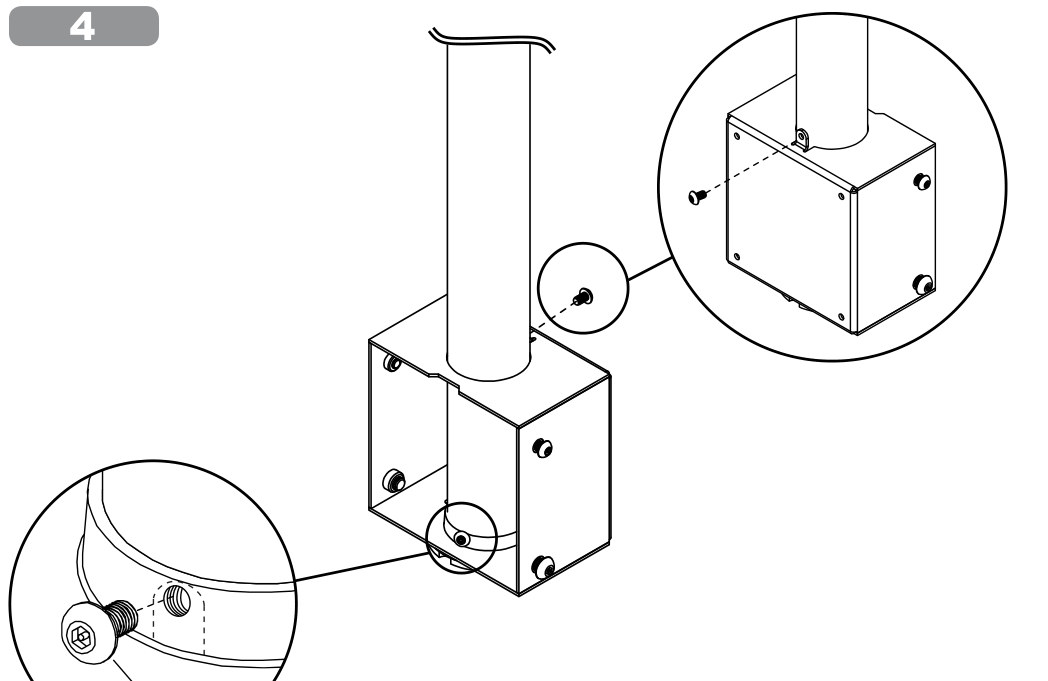
EXT column into the box, locked with an M5 x 10 mm screw.
3️⃣ Connect power and network
- InfoView Display: plug the network cable into the RJ45 (PoE) port on the back. The switch port must supply PoE+ (802.3at) or better.
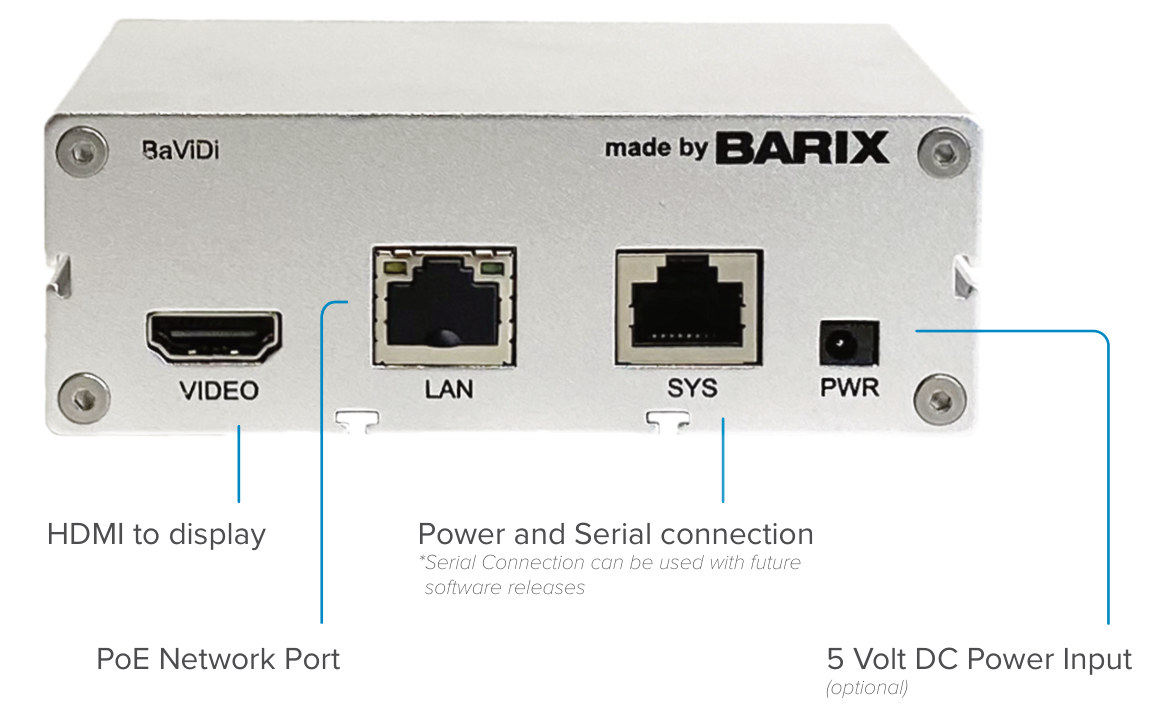
- Display Interface: HDMI from VIDEO to the display, and the network cable into LAN (PoE). Use the 5 V input only if the port can't supply PoE. Leave SYS empty: it's reserved for future software.
- Put the drop on the network the district uses for EPIC devices, and make sure that network can reach the EPIC server: InfoView devices connect to EPIC on TCP 2786, so open it in any firewall or VLAN rule between them.
InfoView Display: PoE RJ45 on the back (left view), USB, SD card, status LEDs and the 3.5 mm reset jack on top.
Interface front: EXT, MEM, status LEDs, reset jack.
Interface rear: HDMI (VIDEO), PoE (LAN), SYS, optional 5 V PWR.
| Status LEDs | Meaning |
|---|---|
| Both red, right one flashing | Booting |
| Both solid green | Booted |
| Left green, right flashes orange for 1 second | Receiving a new display image from EPIC |
4️⃣ Adopt it in EPIC
- With DHCP, the device joins the network and finds EPIC by itself. The screen then shows Action Required and its Device ID (MAC address) in the bottom right corner.
- In EPIC go to Settings and find the device under Unknown Devices (Device Type InfoViewPlayer). Match the MAC to the screen and click the green +.
- In the pop-up, add it as a Clock or a Digital Sign and pick the sign to show. It starts showing it right away. You can change the sign later.
- If you added it as a Clock: go to Settings › Map Setup and place it in the right room. Signs don't need this step.
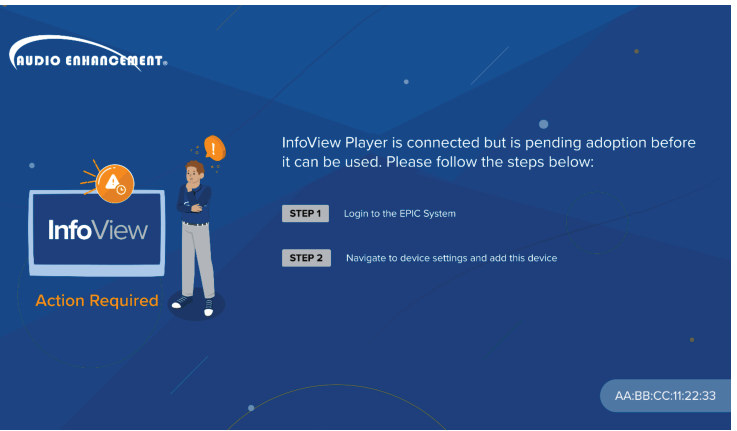
New device waiting for adoption. The Device ID is in the corner.
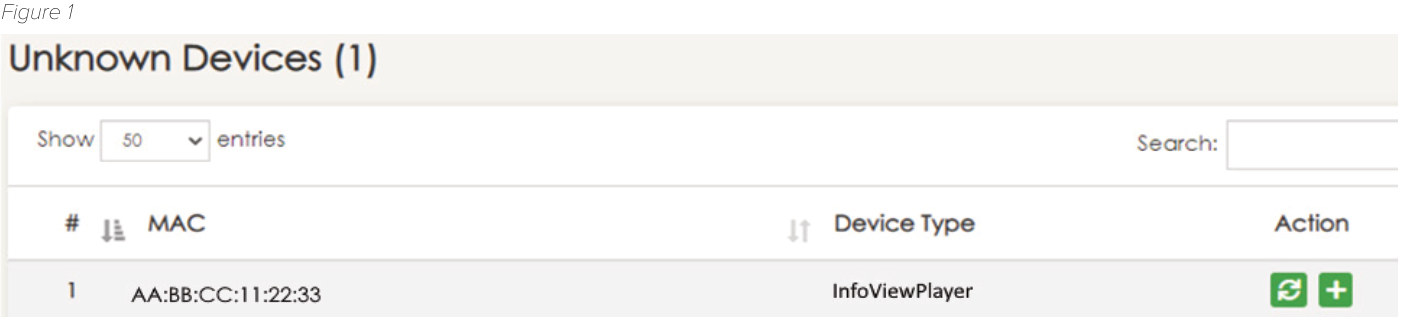
Unknown Devices: click + on the matching InfoViewPlayer.
- Build and edit clock and sign designs in Settings › Clock & Signage, then assign them to the device.
- Once adopted, EPIC sets the time, the clock face and every other setting. You can't change anything at the device itself.
- Sleep mode: each device has a built-in night sleep clock that can't be deleted. To change when it sleeps and wakes, click the pencil on the device in the device list and edit the start/end sleep times.
5️⃣ If it doesn't show up in EPIC
- No DHCP? Open the AE Device Configuration app (iOS App Store or Google Play) on a phone or tablet. It connects over Bluetooth through the BLE USB adapter that ships with the device, and the display must be on HDMI for the adapter to fully boot. Tap the InfoView Player, then Network: set Network Mode to static, enter the IP Address, subnet mask, gateway and DNS, and tap the check mark to save.
- On the network but not in EPIC? In the app, set the EPIC IP field. The screen should change to Action Required; go back to step 4.
- "Could not automatically connect"? Check the device's network settings and cable first, then that the EPIC server is online and reachable from that network. Try again.
- Use Identify in the app to be sure you're on the right unit. The display shows Connected to this Display.
- Can't find it in the app? Plug the AE setup dongle into the EXT USB port on the Interface and scan again.
- System Offline pop-up: the device can't reach EPIC. Check the network path. If needed, delete it from EPIC and add it again.
- Factory reset: put a pin in the 3.5 mm headphone jack and push toward the back of the device for 15 seconds. Then delete the device from EPIC and adopt it again.
6️⃣ Test it
- LEDs are solid green and the screen shows the assigned clock or sign, with the correct time.
- Clocks are in the right room on the map.
- Emergency signs: with the office told first, start a test event in EPIC. Every InfoView should switch to the emergency sign, and nothing else can override it while the event runs. Clear it with All Clear or Stop All; each display should go back to the sign it was showing before.
- Sleep times match the building's hours.
Field tips
- Dark screen on the 24" display? Check that the switch port is PoE+ and has power budget left.
- Blank at night? That's sleep mode doing its job. Adjust the times in EPIC.
- Wrong time? The display takes its time from EPIC, and EPIC from NTP. Check that EPIC points at an internal NTP server, or that UDP 123 is open to ntp.ubuntu.com and pool.ntp.org.
- Emergency sign text can be edited in EPIC to show the school's own response steps.
📚 Sources & credits
- Compiled by Brad Roy, VSC Director of Operations
- Audio Enhancement: InfoView Display Interface Quick Start Guide DC-40963.0324 (setup, troubleshooting, LEDs, reset, sleep, emergency signs); InfoView Display Spec Sheet DC-40935.0225; InfoView Flyer DC-40934.1225
- Mounting: Peerless-AV PLB-1 back-to-back tilt box and EXT extension column instructions, filed by AE under ST-EP-0228 (older documents, undated by AE; Peerless dates 2014 to 2017)
- Images: Audio Enhancement and Peerless-AV (from the AE documents above).