Set Up the Interactive Touch Controller (ITC) with EPIC
Quick Reference QR-AE-029 · Audio Enhancement EPIC · Rev 1.3 · Oct 2026
Wire the ITC wall panel to a classroom MSx device, turn it on in EPIC, and build the touch pages teachers use for intercom, mic linking, alerts and volume.
📄 View or download this guide as a PDF
Click the PDF icon below to open it right here in your browser. In the viewer, use Download (top right) to save a copy, or the printer icon to print it.
The Interactive Touch Controller is a 3.5" color touch panel for the classroom wall. EPIC manages it completely: you design its pages and buttons in Settings › ITC, and the panel talks to the classroom amp over RS-232. Teachers use it to start an intercom call, link an XD mic, send SAFE and building alerts, change volume and, where it's programmed, control other room equipment. The ITC2 adds an ambient mic for two-way calls.
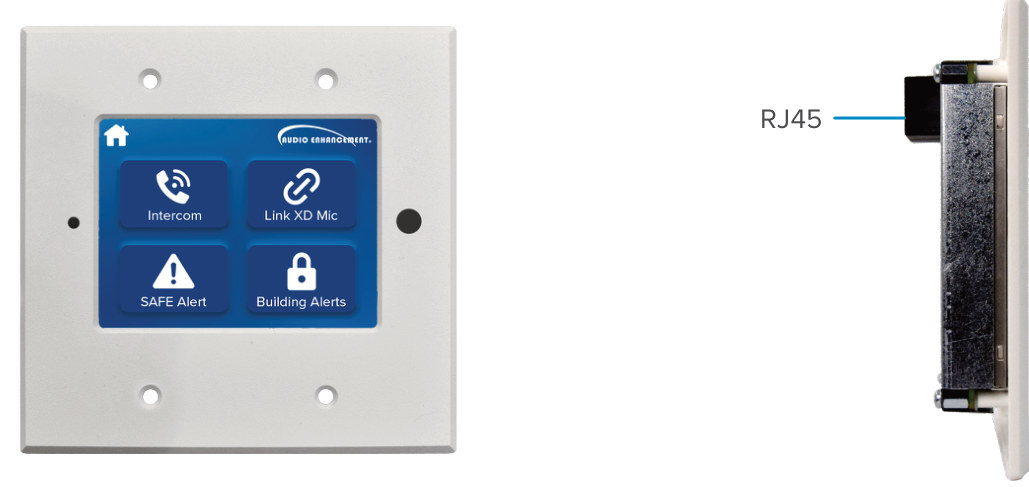
ITC front (default page) and side view with its single RJ45.
| Spec | ITC |
|---|---|
| Display | 3.5" full-color touch, white |
| Connection | One RJ45 carrying RS-232 and 24 V DC from the amp |
| Mounting | 2-gang wall box or low-voltage mounting bracket |
| Size | 4.5 x 4.5 x 1.25 in, 0.4 lb |
| ITC2 mic | On an MS-600 or MS-500, needs adapter cable AC-2179 |
1️⃣ Plan the pages with the customer first
- Agree which functions the room needs, what goes on each page, and how teachers move between pages.
- Every button needs two graphics: a normal one and a pushed one, so the teacher can see the press registered.
- Plan for navigation buttons. The small Home button only takes you back; you need buttons to get to the other pages.
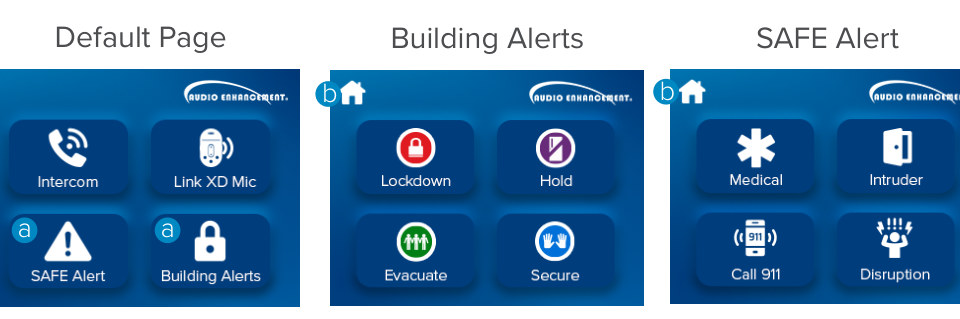
AE's three-page example: SAFE Alert and Building Alerts on the default page open their own pages (a); Home goes back (b).
2️⃣ Mount and wire the ITC
- Mount the panel on a 2-gang box or a low-voltage bracket at the planned location.
- Run cable from the panel's RJ45 to the classroom MSx device's Remote Port 2 (AE's "Port 5"). That one cable carries the RS-232 data and the panel's 24 V power.
- ITC2 on an MS-600 or MS-500: use the AC-2179 adapter cable to connect the ambient mic.
| # | Amp RS-232 port (AE's numbering) |
|---|---|
| 1 | Internal: amp to the network board, sends commands to EPIC |
| 2 | XD Receiver: amp to the XD receiver (SAFE) |
| 3 | Serial Port 1: front RS-232 for third-party devices |
| 4 | Remote Port 1: third-party devices, linking amps together |
| 5 | Remote Port 2: the ITC plugs in here |
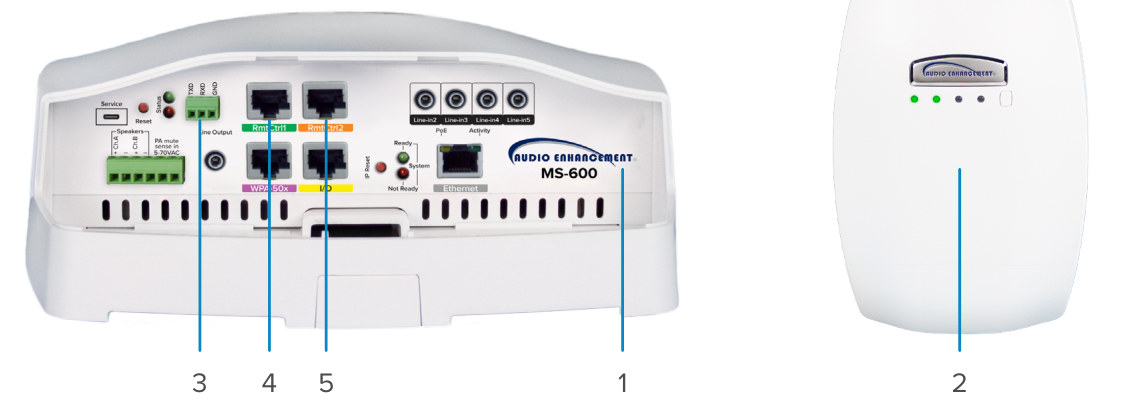
RS-232 ports on an MS-600 (left) and the XD receiver (right), numbered as in the table.
3️⃣ Turn ITC on and set the talkback levels
- In EPIC, go to Settings › Devices. In Known Devices, click the pencil on the classroom amp to open Configure Device.
- Set ITC Enabled to Yes.
- Click Advanced (top right) and scroll to Audio Settings. With an ITC instead of a wall plate, set the talkback sliders:
Slider Set to Why Intercom Talkback Level 70 to 80 % How loud the room is heard at the office on an intercom call. It defaults to 0, so the office hears nothing until it's raised. WPA Talkback Level Lowest (all the way left) There is no wall plate mic in an ITC room, so turn it off. - Click Save, then test an intercom call from the office: the office should hear the teacher clearly with no echo. Adjust in small steps.
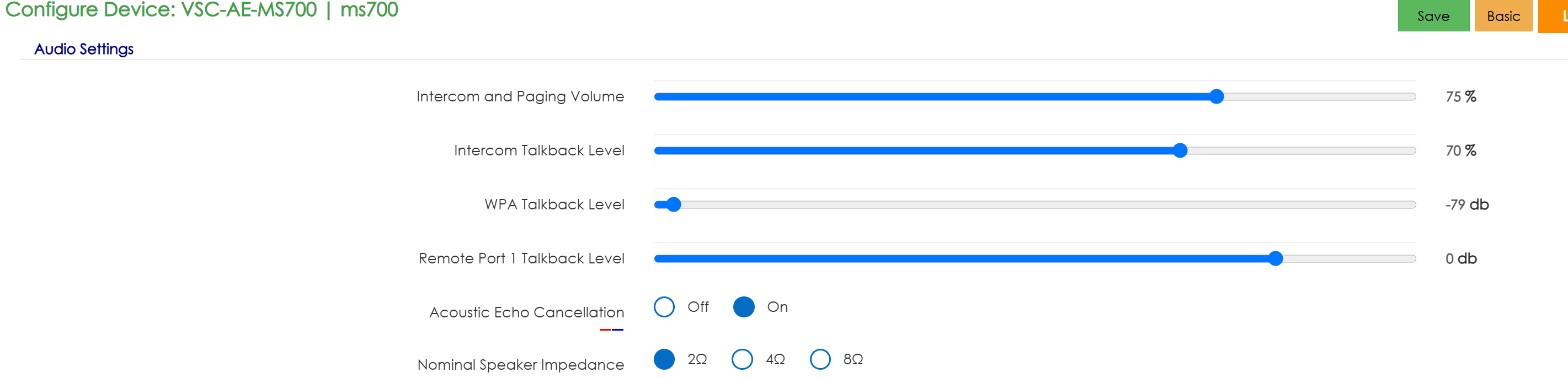
Configure Device › Advanced › Audio Settings on VSC's demo MS-700 with an ITC: Intercom Talkback 70 %, WPA Talkback at the lowest setting. VSC EPIC 3.2.5 demo.
4️⃣ Upload the button graphics
- Go to Settings › ITC › Icon & Image Gallery.
- Click the green Upload button, select all the graphics (normal and pushed) and click Open.
- Check that every file shows up in the gallery.
5️⃣ Build the layout
- Go to Settings › ITC › Layouts and click New Layout.
- Pick one of the four premade layouts for the first page. The small top-left button is Home, the two long buttons are sliders, the rest are standard buttons.
- Name the layout and click the green Save Layout. EPIC renders it and returns to the Layouts list.
- Open the layout and click + to add pages. Pick a layout for each one.
- For each page: turn on the default toggle for the page the ITC should open on, set the background color or image, and use the gear icon for the screen timeout settings.
Each button (click it in the page preview):
- Regular Appearance tab: Include in Layout (on to show it), Show Icon Only (no label), label, text color, fill color and image.
- Pushed Appearance tab: a different fill and image for while it's pressed.
- Button Type: Standard, Volume, Navigation, Custom, Custom (Toggle) and others (step 6).
- Click Save Layout when every button is done.
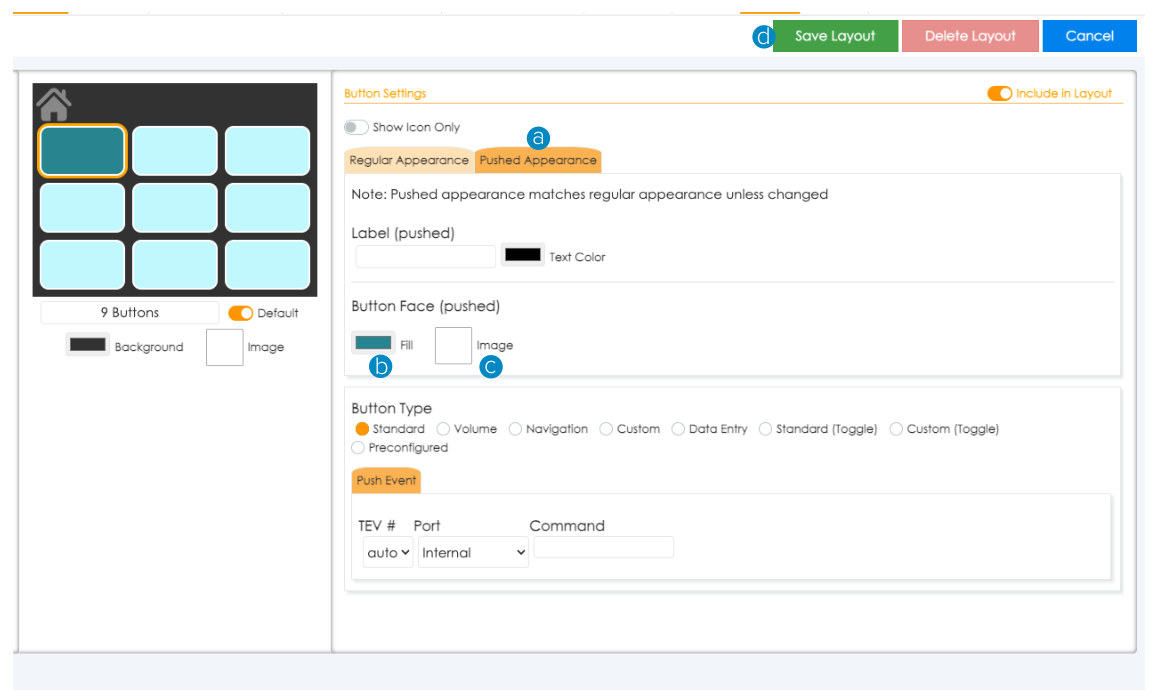
Button Settings: page preview on the left; appearance tabs, Button Type and the TEV # / Port / Command row on the right.
6️⃣ Program what each button does
| Function | Button type | How AE sets it up |
|---|---|---|
| Go to a page | Navigation | Pick the Destination Page. The Home button's image and destination are set by clicking the Home icon. |
| Volume up/down | Volume | Pick the amp input or output (for example Input 2, multimedia) and Increase or Decrease. |
| Mute / unmute | Custom Toggle | Direct amp command $SEO:1:0 (mute) and $SEO:1:1 (unmute), no CR/LF. One latching button does both. |
| Call the office | TEV/SEV command | $CB:1\r\n starts a call, $CB:0\r\n hangs up. EPIC already listens for it. |
| Link XD mic | TEV/SEV command | $SPM:1\r\n presses the XD receiver's Link button. The receiver needs current firmware; older receivers can't do this. |
| VIEWpath record | TEV/SEV command | $CF1:\r\n. EPIC already listens for it. |
| Alerts (Lockdown, Hold, Medical…), call nurse or SRO | TEV/SEV command | $name:1\r\n on Port 1 Internal, for example $lockdown:1\r\n (case sensitive). Then add a matching receiveTCPCommand in EPIC that starts the event. Create the event first. Calling an extension also needs an executeTcpControlCommand such as D6000[CR][LF], set up per room. |
| Third-party gear (panel power, video) | TEV/SEV command | Port 3, Serial Port 1, with the RS-232 on the front of the amp wired to the device. The district supplies the manufacturer's HEX or ASCII codes. |
- Each TEV/SEV command uses a TEV # (container). There are 24 for the whole layout, across all pages; a toggle uses two. Pick the number yourself instead of auto.
- The Port tells the amp which RS-232 link to send on: 1 Internal (to EPIC), 2 XD Receiver, 3 Serial Port 1, 4 Remote Port 1, 5 Remote Port 2.
7️⃣ Test with the teacher's eyes
- The ITC wakes up on the default page and every navigation and Home button lands where it should.
- Each button shows its pushed graphic when pressed.
- Intercom/call reaches the office and hangs up. On an ITC2, the office can hear the room.
- Link XD Mic pairs a teacher mic (QR-AE-013). Volume and mute change the right channel.
- With the office told first, send each alert once and confirm EPIC starts the right event. End it with All Clear.
Command reference
All AE serial commands follow one pattern: $ + a 3-letter command + :parameters, ending with carriage return and line feed (\r\n on the ITC, [CR][LF] in EPIC, 0D0A in hex). Case counts. Leave at least 300 ms between commands sent back to back.
ITC buttons (AE's "frequently used" list)
| Button | Button type | Port | Command | What it does |
|---|---|---|---|---|
| Mute | Custom Toggle | (direct to amp) | $SEO:1:0 | Turns amp output 1 off. No CR/LF. |
| Unmute | Custom Toggle | (direct to amp) | $SEO:1:1 | Turns amp output 1 back on. No CR/LF. |
| Call the office | TEV/SEV | 1 Internal | $CB:1\r\n | Starts a call, same as the wall plate Call button. |
| Hang up | TEV/SEV | 1 Internal | $CB:0\r\n | Ends the call. |
| Link an XD mic | TEV/SEV | 2 XD Receiver | $SPM:1\r\n | Same as pressing Link on the receiver (current receiver firmware only). |
| VIEWpath record | TEV/SEV | 1 Internal | $CF1:\r\n | Starts/stops a VIEWpath recording. |
| Alert or call nurse / SRO | TEV/SEV | 1 Internal | $lockdown:1\r\n$medical:1\r\n$nurse:1\r\n | Any name you choose. EPIC needs a matching receiveTCPCommand that starts the event. |
| Dial an extension (EPIC side) | EPIC action | executeTcpControlCommand | D6000[CR][LF] | Calls extension 6000 from that room. Set per room. |
| Third-party device | TEV/SEV | 3 Serial Port 1 | Manufacturer's HEX/ASCII, ending 0d0a | Panel power, input select and so on. Codes come from the device's manual. |
XD Receiver commands (RS-232 on the receiver)
| Command | Example | What it does |
|---|---|---|
| SVU | $SVU:1 · $SVU:2 · $SVU:L | Volume one step up: 1 = teacher mic (MIC1), 2 = student mic (MIC2), L = line input. |
| SVD | $SVD:1 · $SVD:2 · $SVD:L | Volume one step down (same channels). |
| SVL | $SVL:1:00 | Set a channel to a level. The second value is a 2-digit step: 00 = 0 dB, then each step is 2 dB lower (05 = -10 dB, 10 = -20 dB, 15 = -30 dB); 16 = -32, 17 = -36, 18 = -40, 19 = -44, 20 = -48, 21 = -60, 22 = -70 dB. |
| SMT | $SMT:1:1 · $SMT:M:0 | Mute one output: 1 = MIC1, 2 = MIC2, M = mix. Second number 1 = mute, 0 = unmute. |
| SAM | $SAM:1 · $SAM:0 | Mute (1) or unmute (0) everything at once. |
| SPM | $SPM:1 | Link (pair) a mic. |
| SDS | $SDS:5:1 | Turn a receiver feature on (1) or off (0): 1 mic override, 2 tone, 3 tone level (0 low, 1 high), 4 mic/line mixing, 5 feedback blocker, 6 remote volume. Lasts until power is cycled, then the DIP switches win. |
| SRS | $SRS | Reset volumes and the E1/E2 (alert) states. |
| RAL | $RAL | Release (clear) an alert at the receiver. |
| Queries | $QPW · $QCS:1 · $QVL:1 · $QMT:M · $QDS:5 · $QF2 | Ask for power, mic on/off, volume, mute, feature and SAFE (E2) state. For troubleshooting with a laptop, not ITC buttons. |
| From the receiver | $CF1 · $CF2:1 · $CCS:1:1 · $CVU:1 · $CVD:1 | What the receiver sends on its own: E1 button pressed, SAFE alert (E2), mic turned on/off, mic volume up or down pressed. |
| Errors | $ER1 · $ER2 · $ER3 | Bad command, bad parameter, timeout. |
These are the receiver's own serial commands. AE documents $SPM on an ITC button; the others are listed for the receiver's RS-232 port. Test any of them on an ITC button (Port 2) before handover.
Amp input mute (EPIC event › Custom Command › Serial)
| Device | Inputs | Commands |
|---|---|---|
| MS-700 | 1–3 remote ports · 4 mics · 5, 6 3.5 mm · 100 network audio (bells, pages) | $SEI:4:0[CR][LF]$SEI:5:0[CR][LF]$SEI:6:0[CR][LF] mutes mics and media. Same with :1 to unmute. |
| CZA-1300 | 4 and 5 mics and line in (AE's labels for these are unclear) · 1 remote port · 100 network audio | $SEI:4:0[CR][LF]$SEI:5:0[CR][LF] mutes mics and line in. |
| MS-600 / MS-500A | 1 mic · 2–5 3.5 mm · 6 network audio | One command per action, 1 second apart (500A boards don't take back-to-back commands). |
$SEI:<input>:0 = mute, :1 = unmute, Don't mute input 100 unless the district asks: it silences bells and pages.
Field tips
- Blank panel? Check the cable to Remote Port 2 and that ITC Enabled is Yes.
- Alert button does nothing? The receiveTCPCommand is missing, the name doesn't match exactly (case counts), or the event doesn't exist yet.
- Ran out of buttons? You've used all 24 TEV numbers. Toggles save button space but use two numbers.
- Link button fails on older rooms? Likely old XD receiver firmware.
📚 Sources & credits
- Compiled by Brad Roy, VSC Director of Operations
- Audio Enhancement: EPIC ITC Implementation Quick Start Guide DC-41272.0626 (gallery, layouts, button design, ports, button programming, frequently used command codes); XD Receiver Manual DC-41037.1223 (serial command list); Fire Alarm Mute DC-41008.1025 and ShakeAlert Integration Guide DC-41189.0625 ($SEI input mute); Interactive Touch Controller Spec Sheet DC-40961.0924
- Images: Audio Enhancement (DC-41272.0626, DC-40961.0924).