Install a CZA-1300 Common-Area Amplifier
Quick Reference QR-AE-030 · Audio Enhancement EPIC · Rev 1.2 · Oct 2026
Rack, power, wire and bring up the 300 W, 70 V EPIC amplifier for gyms, cafeterias and hallways.
📄 View or download this guide as a PDF
Click the PDF icon below to open it right here in your browser. In the viewer, use Download (top right) to save a copy, or the printer icon to print it.
The CZA-1300 is the EPIC amplifier for big spaces. It's a 1U rack unit that drives a 70 V speaker line and joins EPIC over the network for bells, paging, intercom and emergency notifications. It needs two power sources: PoE runs the network electronics and AC runs the speaker amplifier. Both must be connected or the unit won't operate.
| Spec | CZA-1300 |
|---|---|
| Speaker output | 70 V, 300 W continuous (1% THD), Class D. Minimum load 19 Ω. Thermal and short-circuit protected. |
| Power | AC 100–120 V or 220–240 V (selectable) for the amplifier, plus PoE 802.3af for everything else. |
| Size | 1.75 × 19 × 10 in (1U rack), 8.5 lb, steel. Ethernet 10/100. |
| Operating range | 32–122 °F (0–50 °C), 10–90% humidity. |
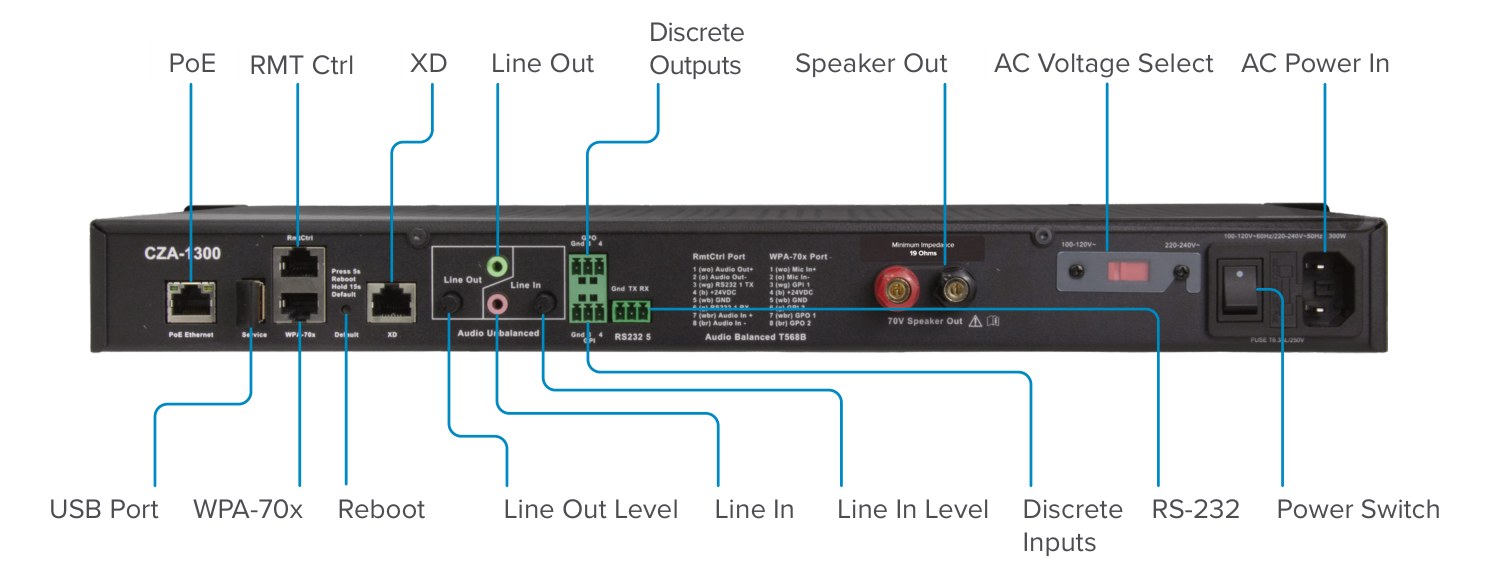
CZA-1300 rear panel. Top, left to right: PoE, RMT Ctrl, XD, Line Out, Discrete Outputs (GPO), Speaker Out, AC Voltage Select, AC Power In. Bottom: USB (service), WPA-70x, Reboot, level knobs, Line In, Discrete Inputs (GPI), RS-232, Power Switch.
1️⃣ Check the speaker load before you wire
Add up the tap wattages of every speaker on the amp. VSC designs to 80% of the amp's rating: 240 W of taps, maximum. That leaves headroom for cable loss and transformer tolerance, and it stays well above AE's 19 Ω minimum load. On a 70 V line, load in ohms is about 5,000 ÷ total watts (70.7 V squared ÷ watts).
| Total speaker taps | Approx. line load | Result |
|---|---|---|
| 150 W | 33 Ω | OK |
| 200 W | 25 Ω | OK |
| 240 W | ≈ 21 Ω | VSC maximum (80%) |
| ≈ 263 W | 19 Ω | At the AE minimum load: too close, re-tap or add an amp |
| 300 W | ≈ 17 Ω | Below 19 Ω: don't do it |
How many AE SP-0300 speakers per CZA-1300
The AE SP-0300 EPIC 70 V ceiling speaker has 70 V taps of 15, 7.5, 5, 2.5 and 1.25 W. At VSC's 240 W limit:
| SP-0300 tap (70 V) | Max speakers on the amp | Typical use |
|---|---|---|
| 15 W | 16 | Gyms, loud open spaces |
| 7.5 W | 32 | Cafeterias, auditoriums |
| 5 W | 48 | Large hallways, commons |
| 2.5 W | 96 | Hallways, quiet areas |
| 1.25 W | 192 | Low-level fill |
Count is the total on the amp's speaker output, across all home runs. Mixed taps: add each speaker's tap and keep the total at or under 240 W. Don't use the SP-0300's 8 Ω bypass on a 70 V line. Arithmetic is VSC's, from AE's 300 W / 19 Ω ratings and the SP-0300 spec sheet; check with an impedance meter if one is on the truck, and ask the PM if a space is near the limit.
2️⃣ Rack it
- Mount in a 19" rack (1U). Rack it on a shelf or rails rated for its weight. AE says to keep heavy units on lower shelves of carts and stands.
- Don't block the vents. Keep it away from heat sources, water and flammable materials.
- Route the power cord so it can't be pinched or crimped. Don't defeat the grounding plug.
3️⃣ Land the speaker line
- Speaker Out is a pair of binding posts (red and black). Screw down bare wire, or use banana plugs, spade lugs or pins (not included).
- Keep polarity the same at every speaker on the run.
- Land the speaker wire with the amp powered off.
4️⃣ Connect the other ports
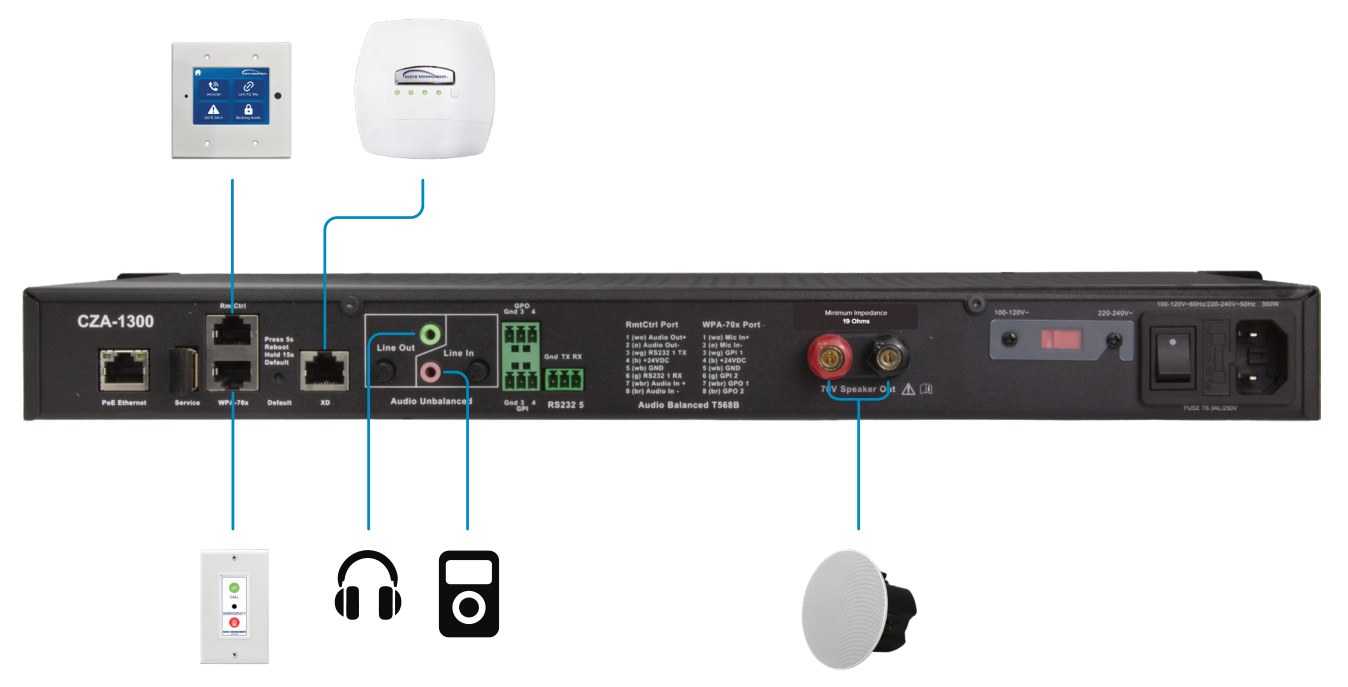
AE's connection example: wall control on RMT Ctrl, XD Receiver on XD, wall plate on WPA-70x, headphones on Line Out, media player on Line In, 70 V ceiling speakers on Speaker Out.
| Port | Type | What plugs in |
|---|---|---|
| PoE Ethernet | RJ45 | The network, from an 802.3af PoE switch port. Powers the electronics and connects to EPIC. |
| RMT Ctrl | RJ45 | AE wall control (AV Touch / LCD ITC wall plate). Carries balanced audio in and out, RS-232 and 24 V. |
| WPA-70x | RJ45 | AE wall plate (call and emergency buttons, mic). Carries GPIO 1 and 2 and 24 V. |
| XD | RJ45 | An external XD Receiver for wireless mics. This port is not Ethernet and has no RS-232: run a separate 3-wire RS-232 cable to the RS-232 Phoenix (receiver TxD › pin 3 RX, RxD › pin 2 TX, GND › pin 1). |
| Line In / Line Out | 3.5 mm, each with a level knob | Unbalanced audio from a PC, media player or aux mic (in), or to headphones and other audio gear (out). |
| Discrete Inputs / Outputs | 3-pin Phoenix each | GPI 3 and 4, GPO 3 and 4 (contact closures for sensors, strobes and similar). |
| RS-232 | 3-pin Phoenix | SAFE System link to an XD Receiver, or control of another device such as a projector. |
| USB | USB-A | Service only. The BLE dongle for setup goes here. |
Pinouts (T568B)
| Pin | RMT Ctrl | WPA-70x | XD |
|---|---|---|---|
| 1 | Line Level Output + | Mic + | Not used |
| 2 | Line Level Output − | Mic − | Not used |
| 3 | RS-232 TXD | I/O In #1 (Call) | Audio mix out (balanced), from XD |
| 4 | +24 V DC | +24 V DC | +24 V DC |
| 5 | GND | GND | GND |
| 6 | RS-232 RXD | I/O In #2 (Emergency) | Audio mix out (balanced), from XD |
| 7 | Line Level Input + | I/O Out #1 | Not used |
| 8 | Line Level Input − | I/O Out #2 | Not used |
| 3-pin Phoenix | Pin 1 | Pin 2 | Pin 3 |
|---|---|---|---|
| GPO (Discrete Outputs) | GND | GPO 3 | GPO 4 |
| GPI (Discrete Inputs) | GND | GPI 3 | GPI 4 |
| RS-232 | GND | TX | RX |
The panel silkscreen labels WPA-70x pins 3, 6, 7 and 8 as GPI 1, GPI 2, GPO 1 and GPO 2.
5️⃣ Set the AC voltage and power up
- Check the AC Voltage Select switch before you plug in. In the US it must be on 100–120 V.
- Confirm the BLE dongle is in the USB port.
- Plug in the AC power cord and the PoE network cable.
- Turn on the rear Power Switch. Check the front LEDs:
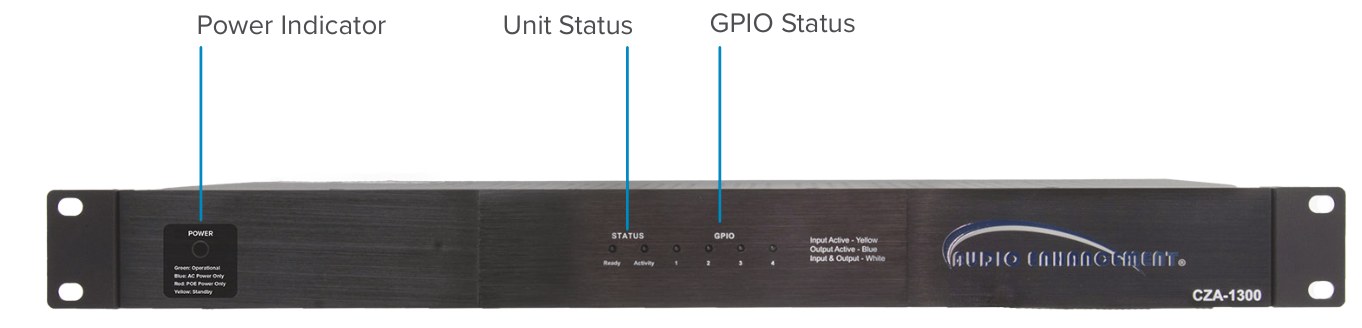
Front panel: Power indicator, Status (Ready, Activity) and GPIO 1–4 LEDs.
| LED | What it means |
|---|---|
| Power | Green = AC and PoE, operational · Red = PoE only (cord unplugged or switch off) · Blue = AC only (no PoE) · Yellow = standby · Off = no power |
| Ready | Red while booting and getting an IP address · Green when on the network and operational |
| Activity | Red while an event is active · Off when nothing is active |
| GPIO 1–4 | Yellow = input closed · Blue = output closed · White = both · Off = all open |
6️⃣ Bring it into EPIC
- Add the device in EPIC (it shows in Settings › Devices › Known Devices) and finish setup in the EPIC software.
- Update its firmware: load AE's current CZA-1300 firmware file in Settings › Update › Manage Current Firmware (browse to the file, enter the version, Save). The CZA pulls it from EPIC daily and on boot; to update right away, reboot it (Settings › Reboot). Details in QR-AE-002.
- The CZA's master volume covers speaker and streaming audio, 0–100% in EPIC. To set levels for the space: Known Devices, blue pencil on the CZA-1300, Audio Settings: set Main Volume (VSC practice: 80% or less), Intercom and Paging Volume and Bells and Notifications Volume, then Save. A later Configure › Save and Push resets these unless the CZA is unticked in the push list (details in QR-AE-011).
- Adding wireless mics or SAFE coverage? Add an XD Receiver with its RS-232 run: CAT6 from the XD port to the receiver's Audio/Power jack, plus the 3-wire RS-232 run above (TX and RX crossed, grounds tied). Then in EPIC open the CZA with the pencil, set Capabilities to XD Enabled, enter the XD Receiver ID, Save, and click Query All XD on Known Devices (details in QR-AE-014).
- Test a bell, a page and an intercom call in the space.
Troubleshooting
| Need to… | Do this (Reboot button, rear panel) |
|---|---|
| Reboot | Hold 5 seconds. |
| Factory reset | Hold until the Activity LED flashes green (about 10 seconds), then release. |
| Rescue mode | Hold until Activity turns red (about 15 seconds), then release. Or unplug PoE, hold Reboot, and plug PoE back in. |
- No audio from the speakers? Plug wired headphones into Line Out and play audio. If you hear it, the amp is fine and the problem is the speakers or speaker wiring. If not, check that AC is plugged in, the Power Switch is on, and the fuse in the AC Power In inlet is good.
- SIP not connected? Check the device's SIP settings, then push them again from the device's Configure tab in EPIC. Pushing from the Devices list does not send SIP settings.
Field tips
- Power LED red? The PoE side is up but the amp has no AC. Check the cord and the rear switch.
- Power LED blue? AC is fine but there's no PoE. Check the switch port is 802.3af PoE and patched.
- Line In source too quiet? Turn up the Line In Level knob before blaming the source.
- Keep paging alive in an outage: AE recommends a UPS. Since the CZA needs both feeds, back up the AC outlet and the PoE switch.
📚 Sources & credits
- Compiled by Brad Roy, VSC Director of Operations
- Audio Enhancement: CZA-1300 Amplifier Manual DC-41133.0525 (specifications, interfaces, LEDs, connector details, speaker connector, standby, safety, troubleshooting); CZA-1300 Quick Start Guide DC-41049.0525 (process, power-up, LEDs)
- Audio Enhancement: CZA-1300 Amplifier Pinout DC-41216.1025 (RMT Ctrl, WPA and XD pinouts, rear-panel labels)
- Speaker-load tables: VSC's 80% design rule (240 W) and calculation from AE's published 300 W and 19 Ω ratings; SP-0300 taps from AE's EPIC 70V Ceiling Speaker spec sheet DC-40797.1024.
- Images: Audio Enhancement.